Home Espresso Machines With Shot Timers Compared for Consistency
By Luca Moretti • 21st Sep
Quick verdict
Quick verdict: Choose the Diletta Bello+ for the clearest documented timer workflow, automatic reset, and programmable passive preinfusion. Choose the Rocket Espresso Giotto Cronometro V if you prefer a separate front-panel timer and concealed temperature controls.
- Choose the Bello+ if: You want the PID screen to switch into an upward-counting timer when brewing starts, reset afterward, and provide documented preinfusion programming up to 10 seconds.
- Choose the Rocket if: You prefer elapsed time on a dedicated front-panel display rather than sharing the PID screen with temperature information.
- Main trade-off: The Bello+ has more clearly documented timer behavior and preinfusion control; the Rocket uses a separate timer display, with its timer workflow reported in a retailer review.
Important: The comparison does not independently test timer accuracy, temperature stability, shot repeatability, or cup quality. Use either machine with a scale and a one-change-at-a-time dialing-in process.
When the question is which espresso machines with a shot timer to choose, it is tempting to hunt for a winner based on the display alone. That misses the useful part. A timer is a simple home-espresso consistency tool: it lets you repeat one part of a recipe while you pay attention to what matters in the cup, sweet, bitter, thin, or balanced. For a home barista who wants dependable mornings rather than another layer of jargon, the better machine is the one whose timer and controls fit a repeatable workflow.
This step-by-step comparison focuses on two heat-exchanger machines with integrated timers: the Diletta Bello+ and the Rocket Espresso Giotto Cronometro V. A timer can make elapsed extraction time easier to observe and repeat, but it does not by itself guarantee repeatable shots or better cup quality. PID control cannot correct an inconsistent grind, dose, or puck preparation. Paired with a scale and a short recipe card, these machines can remove the "Did I run that shot for the same time?" doubt.
Bounded choices, repeatable shots, taste you can set a clock to.
Step 1: Decide what "consistency" means in your kitchen
Before comparing screens and controls, establish the four things you want to keep steady:
- Dose: Use the same amount of ground coffee each time.
- Yield: Weigh the espresso in the cup so the output stays consistent.
- Brew time: Record the elapsed time shown by the machine.
- Taste: Name the result in plain language: sweet, sharp, bitter, flat, heavy, or thin.
The timer is not a scorecard. It is a checkpoint. If a shot tastes bright and thin at a familiar yield, a finer grind is usually the next single change to explore. If it tastes bitter and slow, coarsen the grind a little. Keep dose and yield fixed while you make that adjustment; otherwise, you cannot tell what solved the problem.
That is why semi-automatic timing features are valuable. An integrated timer can make elapsed extraction time easier to observe at the machine. They do not automate dialing in, but they make your manual process easier to reproduce.
I have seen new home baristas stall in front of a grinder because every setting feels like a referendum. For Bello+ dialing-in, the retailer guide recommends using a scale to keep yield consistent and making one adjustment at a time. A three-line note—dose, grind, time—gives you a simple record of that process. Brew three shots, circle the favorite, and make it tomorrow's default.
Step 2: Compare how each timer enters the workflow
Diletta Bello+: timer on the PID screen
The Diletta Bello+ uses its front PID screen as the shot timer during brewing. The screen doubles as a timer: lifting the brew lever starts water flow and switches the display to an upward-counting timer in seconds. When brewing stops, the timer resets.
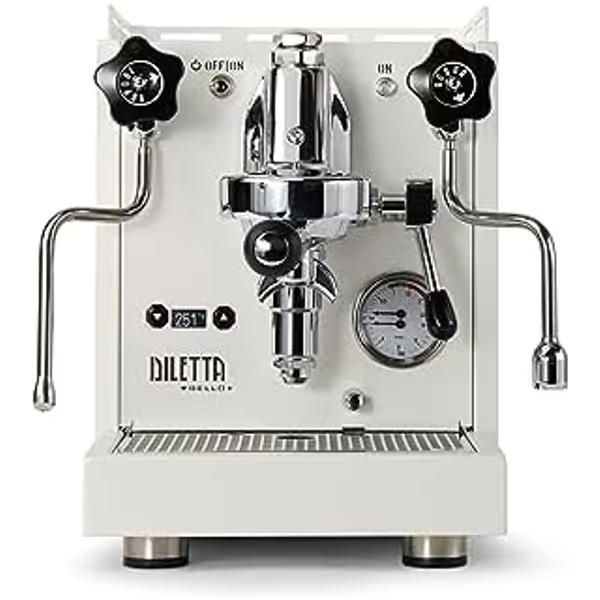
Diletta Bello+ Espresso Machine
Consistent espresso, customizable control, and built to last.
Built InMilan, Italy
Built InMilan, Italy
Pros
PID control & preinfusion for consistent shots.
Durable stainless steel construction.
Eco-mode saves energy.
Cons
Machine can get very hot; requires flushing.
Manual controls require barista skill.
Customers praise high-quality, consistent espresso and excellent steam, appreciating customizable pre-infusion and temperature.
Customers praise high-quality, consistent espresso and excellent steam, appreciating customizable pre-infusion and temperature.
For a routine-driven brewer, that sequence is especially clean:
- Lock in the portafilter.
- Place a cup on a scale.
- Raise the brew lever.
- Watch yield and elapsed time together.
- Stop the shot at your chosen yield, then taste before changing anything.
The benefit is not that the screen makes a shot perfect. The benefit is that the time record is automatic within the brew action: lever up, timer runs; brewing ends, timer clears for the next shot. That is a low-friction brew-time display in the Bello+'s favor.
The Bello+ also includes programmable passive preinfusion for up to 10 seconds. That gives you another variable to set deliberately, not casually. Once you find a preinfusion setting you like for a coffee, leave it alone while you dial in grind and yield. Change it only when you have a clear reason, such as testing a new coffee with a fresh baseline.
Rocket Espresso Giotto Cronometro V: dedicated front-panel timer
The Rocket Espresso Giotto Cronometro V includes a digital shot timer and a PID-controlled heat-exchanger design. A retailer review reports that its dedicated front-panel timer starts with the brew lever.
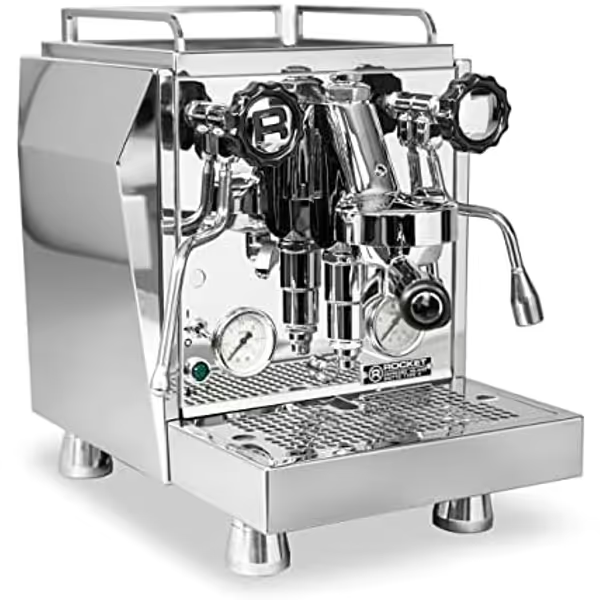
Rocket Espresso Cronometro V
Consistent espresso, customizable temperature, and timeless Italian craftsmanship.
Boiler Type1.8L Heat-Exchange
Boiler Type1.8L Heat-Exchange
Pros
Consistent, café-quality shots with PID control
Fast heat-up and steaming for multiple drinks
Premium Italian build quality and prosumer components
Cons
Potential for costly, time-consuming international repairs
Reports of leaks experienced by some users
Customers praise its build quality and excellent espresso/milk, but note potential leak issues and costly international repairs.
Customers praise its build quality and excellent espresso/milk, but note potential leak issues and costly international repairs.
That dedicated display is the core distinction. Rather than borrowing the PID screen for the timer, the Giotto Cronometro V has a front-panel digital timer. If you prefer the visual separation of "time" from "temperature setting," that can make the information easier to parse during a busy morning.
Temperature controls are adjusted with arrow buttons behind the drip tray. This is a more tucked-away approach than the Bello+'s front-mounted PID screen. Neither placement is inherently better. Choose based on your own behavior:
- Want temperature information and changes immediately visible? The Bello+ puts its PID screen at the front.
- Want a dedicated timer display and are comfortable treating temperature changes as occasional setup rather than daily interaction? The Giotto Cronometro V's layout may feel more focused.
Both machines use 1.8 L heat-exchange boilers. The Bello+ is documented as permitting simultaneous brewing and steaming. That is relevant if your morning includes milk drinks, but it does not prove one will steam faster, recover faster, or make more consistent drinks than the other.
Step 3: Understand the PID without giving it too much credit
A machine with both a shot timer and PID gives you two different aids. The timer records elapsed extraction time. PID is a temperature-control approach that continuously adjusts boiler heat toward a selected target instead of relying only on broad on/off thermostat cycles.
That can give you a more deliberate way to manage a temperature setting, but it is not a replacement for coffee prep. A PID cannot fix:
- a changing grinder setting,
- an inconsistent dose,
- uneven distribution, or
- a different final beverage weight.
Treat the controls as a system of lanes. Put your recipe in one lane: dose, yield, and time. Put the machine setting in another: temperature selection and, on the Bello+, passive preinfusion. Work in one lane at a time. That constraint is what makes your tasting notes useful.
There is an important technical limit in this comparison: the temperature controls should not be read as direct measurements of brew-water temperature at the puck. On the Bello+, you view and adjust steam-boiler temperature. On the Giotto, you get heat-exchanger PID temperature control with an adjustable temperature display. Those are meaningful features, but they are not the same thing as independently measured puck-temperature performance.
Step 4: Use a repeatable recipe on either machine
Here is the practical routine I recommend for both machines. It is intentionally narrow; confidence comes faster when you have fewer moving parts.
Your four-point shot card
Write down:
- Coffee: name and roast date, if you track it
- Dose: your chosen basket dose
- Yield: the beverage weight you stop at
- Time: what the built-in timer showed
Then add one taste word: sweet, bitter, or flat. If you want to spot patterns across coffees and mornings, a simple espresso shot log can make these notes easier to use. You can add "sharp" or "thin" if helpful, but do not write a novel before breakfast.
The adjustment rule
- Pull the first shot with your chosen recipe.
- If it tastes good, record it and stop adjusting.
- If it is fast, thin, or sharp, make the grind a little finer next time.
- If it is slow, harsh, or bitter, make the grind a little coarser next time.
- Keep dose and target yield unchanged while testing the new grind. For a more detailed process, use this espresso dialing-in guide to connect dose, yield, time, and grind adjustments.
As a starting point, try 25-30 seconds for a double shot. Use that as a reference, not as a universal rule. Different coffees and recipes can taste best outside it. The cup and your measured yield get the final vote.
For the Bello+, include a brief cooling flush before the first shot: 3-5 seconds, followed by a 5-10 second wait. Build that into your card if you use the machine, rather than improvising it differently each morning. Diletta lists a 15-minute warm-up time, while the retailer guide says to allow at least 20 to 25 minutes of heating before first use.
Step 5: Choose the timer style that reduces your friction
Choose the Diletta Bello+ if you value visible, programmable checkpoints
The Bello+ is the clearer choice if you want:
- A PID display that automatically becomes an upward-counting timer while brewing.
- Timer reset when brewing stops.
- Programmable passive preinfusion up to 10 seconds.
- Front-mounted visibility for viewing and adjusting the steam-boiler temperature.
- A 3 L water reservoir.
Its workflow is easy to describe to another person in the household: raise lever, watch timer and scale, stop at yield. That simplicity helps make a shared setup repeatable.
Choose the Rocket Espresso Giotto Cronometro V if you value a separate timer display
The Giotto Cronometro V fits the brewer who wants:
- A digital shot timer.
- A dedicated front-panel timer.
- A timer reported to start with the brew lever.
- Heat-exchanger PID temperature-control technology with an adjustable temperature display.
- Temperature adjustment through buttons hidden behind the drip tray.
This layout may appeal if you like your extraction clock visually separate from the machine's temperature-setting interface.
Step 6: Make the final comparison without pretending there is a universal winner
| Consistency checkpoint | Diletta Bello+ | Rocket Giotto Cronometro V |
|---|---|---|
| Timer display | PID screen switches to timer during brewing | Dedicated front-panel digital timer |
| Timer start | Brew lever starts timer | Retailer review reports that the brew lever starts the timer |
| Timer reset | Auto reset when brewing stops | Not specified in the collected product information |
| Preinfusion control | Programmable passive preinfusion up to 10 seconds | No equivalent preinfusion programming is documented in the available product information |
| Temperature interface | Front PID screen; steam-boiler temperature | Adjustable display; buttons behind drip tray |
| Brew/steam architecture | Heat exchanger; simultaneous brew and steam | Heat exchanger |
For most home users, the meaningful decision is not "Which timer is more accurate?" Ask instead: Which display behavior will I actually use every morning?
- Choose the Bello+ for the most clearly documented automatic timer workflow and programmable preinfusion.
- Choose the Giotto Cronometro V for the appeal of a separate front timer and a more concealed temperature-adjustment interface.
Both can support a disciplined recipe. A timer can help you track elapsed time, while PID cannot replace consistent grinding, dosing, and puck preparation. Use a capable grinder, a scale, and a one-change-at-a-time dialing-in habit.
FAQ
What is PID on an espresso machine?
PID stands for a feedback-based temperature-control method that continuously adjusts boiler heat toward a set target, rather than using only broad thermostat cycling. It can make temperature changes more manageable, but it cannot correct inconsistent grind, dose, or puck preparation.
Is a PID worth it for a home espresso machine?
It is worthwhile if you want a more deliberate, repeatable temperature-setting workflow and want to make controlled changes when you switch coffees. It is less valuable if the rest of your process is changing every day. Get dose, yield, and grind under control first; then PID becomes a useful refinement rather than another distraction.
When should I start the timer for espresso?
With these two machines, the timer start is tied to raising the brew lever; for the Rocket, that workflow is reported in a retailer review. Keep that start point consistent for every shot. If you use programmable passive preinfusion on the Bello+, record that setting alongside your displayed time and use both as your own repeatable reference.
Is the 30-second rule real?
Think of 25 to 30 seconds as a starting range, not a commandment. If a coffee tastes sweet and balanced at a different time and the same recipe logic is repeatable, that result is more useful than forcing it to hit a round number.
Keep exploring, one variable at a time
A shot timer is small technology with a large behavioral payoff: it gives you a stable reference when coffee, mornings, and attention are all in short supply. Start with one coffee, one dose, one target yield, and one timer convention. Once you can make that cup reliably, explore temperature or preinfusion with the same discipline.
The goal is not to turn breakfast into a lab. It is to build a calm little system that delivers taste you can set a clock to and leaves you free to enjoy the espresso rather than second-guess it.
Related Articles